Showing posts with label DIY. Show all posts

Monday, February 10, 2014

DIY Love Notes

I've never been a huge fan of Valentine's Day but I am a huge fan of letting people know they are loved! This is my first Valentine's with BSR and while we're not planning anything too special, I am definitely going to use this notorious holiday as a chance to let him know he is loved!

I've been browsing Pinterest for some sweet DIY Love Note ideas and have shared my favorites below!


What are your Valentine's Day plans? 


Today's Pickins:

Monday, April 1, 2013

Hair to Swear By!

Normally I am not one to try crazy hair products. In fact, rather than the typical Herbal Essecence shampoo and condition, I rarely touch my hair with any other product. 

Unfortunately, this hasn't helped me avoid all of the paraffin in hair products and I had a build up break down this weekend.

I had just showered and after blowdrying my hair, i still had a waxy film that, upon straightening, only got worse. After a few tears, I found this bad boy on Pinterest. 


Behold! It seemed like a smart idea but the image didn't cluck through, so I had to do a little googling. 

With the help of my mama, I decided to wash my hair in the laundry room sink. After using baby shampoo (which has NO paraffin), we used a spray bottle that was a mixture of half white vinegar and half water, spraying it throughout the layers on my hair. I let it sit for ten minutes and then rinsed it out.

I can honestly say my hair has never been felt so soft and light! It's like post-salon hair!

Viola! 


I recommend this trick for anyone whose hair needs a little life! 

Let me know if you try this hair trick! 


Today's Pickins:

Friday, February 15, 2013

What to do, Bamboo?!

If you follow me on instagram, you might have seen a sneak peek at one of my recent flea market finds!

I picked up this great Hollywood Regency Bamboo dresser, mirror, and two nightstands. 


My original intent was the paint the set green, like the image below:


However, now I am just not sure if I want to paint it or keep it off white!! 

The colors for my room are white, champagne gold, black, and kelly green.


I am also lusting over these color choices, too.


What would you do if you were in my shoes?! HELP!! 


Thursday, December 20, 2012

Saw It. Pinned It (literally). Did It.


Upon decorating our Christmas tree a few weeks ago my family realized that we had thrown away our beloved tree topper last year because it was--well, old!

I thought to myself "Oh, Pinterest will have so many tree toppers!"

WRONG.

The only one I could find was THIS one and, let me tell you, it was super flimsy.


So, I decided to improvise with what we had in our home! We are big JCP shoppers as of late in my family and I just love what the rebranding has done for the store! When my mom and sister stopped by on Black Friday to check out deals, they were handed a few cute, tiny holiday buttons with codes on the back. You could enter up to two codes a day (per email) and would win prizes. Pretty simple!

So, they came home and we entered six button codes that day. Sure enough, we won  $5, $10, and $25 giftcards! The buttons were cute and we were getting free money to shop--could anything be better!? We decided to make some fun with it each time we were at/ by the mall, stop in to JCP and pick up a few buttons.


Last week, I counted that we have 103 buttons! Crazy! I've been saying all along I wanted to craft with them but wasn't sure just what to make. Then it hit me--a tree topper!


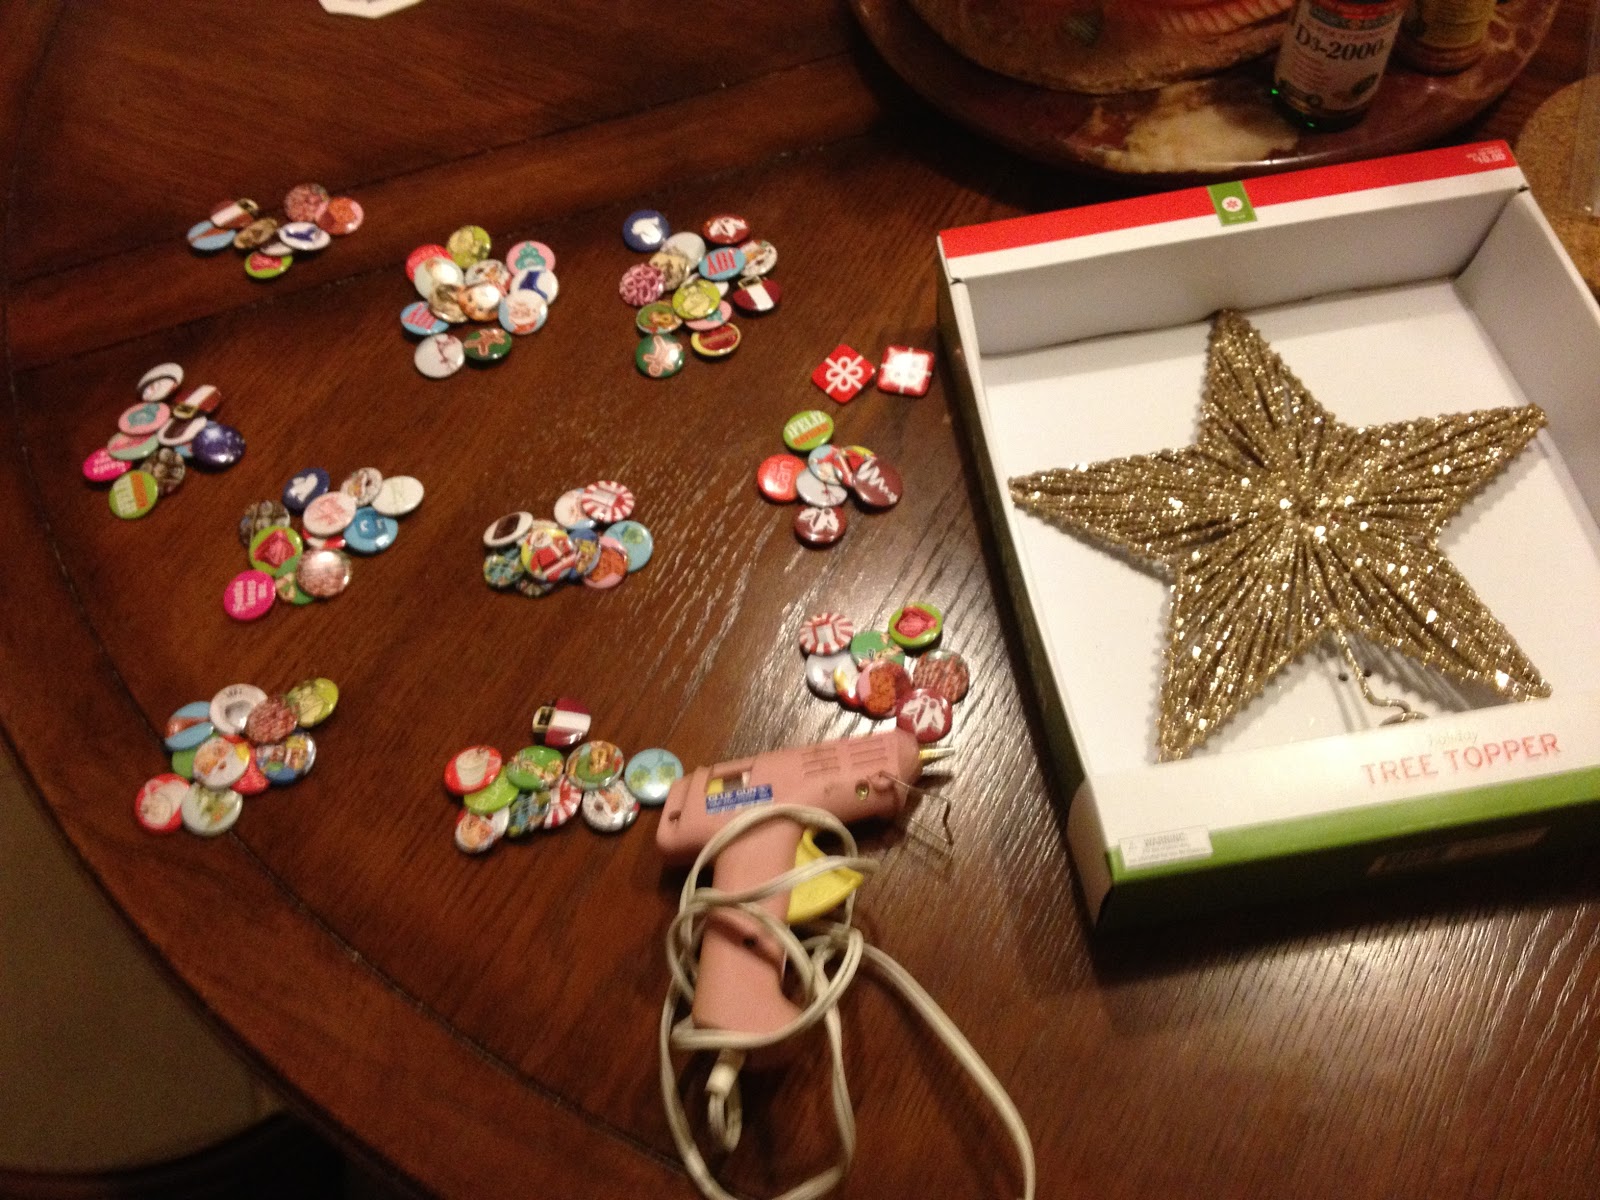
Here are the supplies:


I bought a basic star tree topper from Target, and used the buttons and glue gun I already had! I picked a star with a base color that  I liked because I knew it would peak through in some areas. You could even spray paint a star to be a favorite color.

Note: People are actually selling packs of 100 of these buttons on ebay. Just saying.


I first sorted the buttons into little piles with image and color variety. I found this to be a lot easier than picking from a larger pile when putting the patterns together.


Once the glue gun was hot, I opened the clasp on the back of the buttons and put a dollop of hot glue in the middle. Then I carefully put the buttons in place by weaving the latch through the wires that made up the base star. Then, I simply pressed down to let the glue dry, which held the button in place. 


 I started with one of the horizontal points and, more or less, outlined the point to make a pie shape. I found myself bending some of the latches in order to keep the the buttons on the direction desired.


 I did this until I had finished a point! Voila!


Then, I continued tracing around the edges, outlining each point and then filling it in.


 Once all of the points were filled, I put the present button in the middle (the only square button!) and filled in the gaps! Now, Your first side is done!! 


Now, repeat the process on the other side! Just make sure to avoid poking yourself with any latches that may have stuck through!


Then, you are done! 

This project took me just short of two hours to complete.


I love all of the colors reflected in the buttons! My favorite button has to be one of the vintage ornaments! Do you spot any that you just love?


Today's Pickins:

Thursday, December 6, 2012

Saw It. Pinned It. Did It. {DIY: Vickers' Bow Bracelet}

FYI: Today's the LAST DAY to enter the giveaway! It ends at midnight! 


So today's SPD {my new abbreviation for this} is a mash of something I liked and essentially created my own tutorial for. Hopefully you enjoy it as much as I have! 


The Vickers' Bow Bracelets from KJP premiered not too long ago and have been a preppy staple since. 


These puppies have been blowing up style boards across pinterest so I decided to try my hand at a DIY version of this.

I also happened to wander into Michael's this past Saturday  where all holiday ribbon was 70% off--and I couldn't resist all of the tartan patterns! I figured for the low price, it was worth the random DIY! After all, spur of the moment crafting seems to be when I do my best work!


Isn't is pretty!! Here is how I did it!


Disclaimer: I decided to use elastic instead of chain/ hooks because that was what I already had. Besides the supplies shown, I also have my own sewing machine. Because the only thing I had to buy was the ribbon, I spent a grand total of UNDER $2


First, I cut a strip of the ribbon this size of my wrist. The ribbon had wire in it, so I made sure to pull the wire strands out before moving to the next steps.


I then turned the ribbon inside out and pinned down flat. 


I sewed along the red line and when I was done, flipped the ribbon back from inside out to the right side. 


I then made a fabric bow with another piece of ribbon that I cut. If you are unsure how to make a fabric bow, check out this great tutorial HERE.


This part needs to be sewn by hand and not with a machine.


I then attached the bow to the middle of the "band" that we made before. I also sewed this by hand.


Lastly I attached the elastic. When the elastic is not stretched, the two ends of the band meet. However, they pull apart to reveal the elastic, which also allows you to slip the bracelet on and off of your hand!


There you have it, kittens! The whole project took me about 30 minutes, too! 

Let me know if you decide to try this DIY--I'd love to see how yours turns out! 


Today's Pickins:

Thursday, November 29, 2012

SAW IT. PINNED IT. DID IT.

On today's edition of "SAW IT. PINNED IT. DID IT." we're talking a look at a simple, yet fun, necklace I had been dying to try! 


I decided to make this little beaute on a whim! I was waiting for the Florida/ Florida State game to start (woo woo GO GATORS!) and when going through stuff in my room, found a baggie of pearls and some ribbon. I only had a thinner ribbon, so once again, this is my own spin on the project!


If you were cool enough to click through the pin, you might have realized there is no tutorial! Luckily, I had made a similar bracelet before, which can be found HERE. That tutorial is a great help. 

My bag of pearls had three different sizes. i didn't have quite enough to do a strand of pearls all the same size, so i organized the beads into piles and they laid them into a pattern that I liked.


As per the tutorial, I folded the ribbon and string the pearl.

I continued this process until I was happy with the desired length. At that point, I knotted off the string to secure the ribbon and pearl strand and left a piece of the ribbon hanging, just like in the picture.

Because my piece of string was long enough, I continued by threading the pearls on in the pattern I had preset.When it came time to add the ribbon back in, I simply left a long piece hanging, and then folded the ribbon, following the same pattern as before. 


I continued the previous step until I was happy with the desired length of the necklace. Unfortunately, my piece of ribbon wasn't quite long enough to tie well, so I knotted on a longer piece of ribbon to be the lie and left a second hanging strand. See! My own interpretation ;)


Voila! Final product! I doesn't look THAT much like the original, but I think that is what I like about it! The emerald is festive for the holiday season and the thin ribbon keeps the necklace from being too much of a statement! Plus, now that I have learned from my mistakes, I could do it again with bigger pearls, thicker ribbon, etc and the necklaces wouldn't be the same!

This was an easy project and would be a fun DIY for a gift for a friend! 


I look forward to reading through the rest of the link ups and hope you all participate in the future, too!


Today's Pickins:


P.S. My first giveaway starts tomorrow!! Come back, check it out, and enter! 

Monday, November 5, 2012

Sunday Sewing: Pillows and Frockets


This weekend was spent with me, myself, and my two pups. Perfect chance to be a little lazy, a little drinky, and mostly a lotta crafty.

I knew I wanted to get some sewing done, so I headed over to Joann’s to check out fabrics from my two Sunday Projects.


{Project One}

I had seen a DIY on Pinterest for making pocket sweatshirts similar to those from The Frat Collection. Even cooler  I won a giftcard to TFC from a giveaway last month and I am super excited to get a TFC shirt of my own!

I decided I wanted to make a less “fratty” version of the sweatshirt and bought a comfy cardinal red crewneck from Walmart, which I paired with a leopard fabric I found at Joanns!

After buying the fabric, the first major task required me to make a pattern of a pocket, which you can see in the pictures. I used a measuring tape to measure a frocket on a favorite tee of mine and added some “buffer” room, which I used for hems later on.


I then pinned this pocked down to the frabic and cut it out! To make the folds even where I was planning to make stitches, I actually used an old flat iron instead of pulling out my full iron! My favorite sewing trick ;) I then took the time to sew down each edge creating a fabric pocket!


Next, I simply put the sweatshirt on and held the pocket up to the place where I liked it most and pinned the pocket down.


The last step was to simply sew the pocket down onto the sweatshirt! I stitched along the hemline from before as to not make extra lines! As silly as it sounds, remember to leave the top of the pocket open.


Voila!!
Look out for this bad boy in a future OOTD post!


{Project Two}

My second project was pretty simple. I have a storage bin that I made a few summers back with my dad that I used in the sorority house since we never had storage. Clearly, this moved home with me when I left.

{Fun fact, we call the bin a “Body Box” because you could probs fit a few dead bodies in it…}

Anyhow, the top of the bin is hinged and I have always left pillow on top, letting it serve as a window seat of sorts! The last two years, my rooms in the house have had pinks in the theme, so I had pink pillows on top.

My room now is all black, white, and gray, with aqua walls. Pink, well, doesn’t match.

I had originally planned to copy this idea I found on pinterest.


I couldn’t find a pretty lace that I wanted to use and while searching up and down aisles for the fourth time, I stumbled across this fabric gem!


I instantly knew it was “the one” and headed straight over to get two yards cut! The fabric is a shiny pewter with a black lace overlay. It is very 20s inspired and reminded me of something I'd see at a Prohibition Party! 

The best part?  The $19.99 fabric was already 40% off, taking it down to $11.99. THENNNNN I had a coupon from the Joann app for 25% off my entire purchase, bringing the fabric down to $8.99 a yard!! I was overjoyed, to say the least!

Here is a picture of how the pillow turned out! I am so in love with the pewter underlay, I am actually thinking about going back to buy more fabric to make party dress! Tempting…


Have you taken on any sewing projects lately?